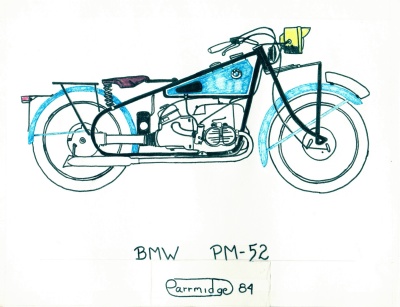
BMW Flat Tank
Pokie Parmidge
02/07
A few years ago I came up with an idea of using some of my old parts to build a nice looking "rider." As you can see by the drawing, a few years turned into over twenty. Originally, I had a worn-out engine, a transmission, shaft and rear drive to start the project with. I came across a frame, wheels and forks for a good price so instead of building my "project" bike, I just built up another, ordinary R-60. In 1997 I tried again to build my project bike, but again the parts went to help another bike in need. It started to seem like the bike would never be built. Over the last several years I collected up enough parts to again reserect the project.
|
The bike as I envisioned it back in 1984. |
Starting last month (January '06) I again started moving forward on the Flat Tank project. The motor I ended up with is that from a '67 R-60. This motor had a sad life. It was removed from a chopper frame after the crank had gone bad and started seizing, before the engine had seized it dropped the head off a valve and holed one of the pistons. I found the cylinders to be on second over and worn-out. I have never seen heads this worn,.... never. Both heads were missing parts, the right head had guides that had been so over-bored that the intake guide hole was almost 3/4 of an inch in diameter! The left head (the one that lost the valve) had springs that were totally collapsed doing no springing action at all. None of the valve springs had lower spring retainers, so, they all left deep grooves in the heads.
The transmission wasn't too much better off. It seems the old owner of the transmission decided to overhaul it himself. After using screw drivers to pry off the inspection cover and breaking the output flange trying to get it apart, he tossed the whole thing out into his back garden. I can't say how many years it lay out in the garden but when I got it, it was rusted solid.
| A sad transmission indeed. |
Taking the transmission apart was kind of funny, digging through the hardened mud/ clay made me feel more like an archaeologist than a mechanic.
| Starting to chip out the dried mud. |
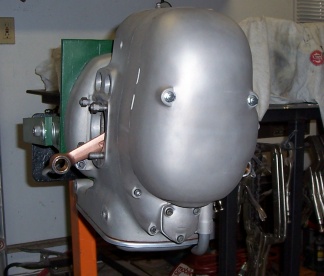
Next was the rear drive. The rear drive was rescued from a shed that burned almost to the ground before the fire was put out. It still turned but the seals had melted and the case was visibly singed.
 |
The rear drive after initial cleaning. |
After taking stock, I found a number of parts that I could use. Even so, a good number of parts will have to be ordered, made or heavily modified to suit. The removing and replacing of parts is kind of boring but needs to be done, it's the making and modifying I'm really looking forward to!
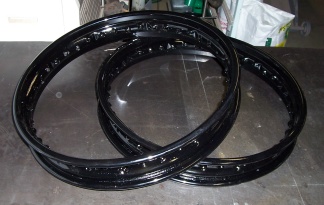
Here it is still February and I've started moving forward on several fronts! Got an order off to Germany for most of the required engine parts (including crankshaft parts), it's just wait time until they get here. I've ordered some bent tube from JC Whitney to start fabrication of the exhaust system. Three fenders were ordered from a place on the web called Cyborg Cycles, one for the front and one and a half for the rear. I've just bought two wheel rims from a fellow off the Internet BMW Riders Club. The rims are a rusted mess but that's ok as I plan to blast them and have them powder coated.
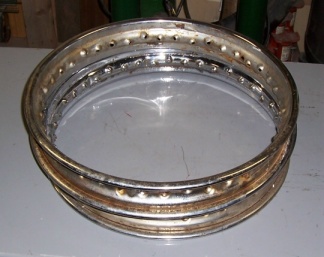 |
The rims after they arrived, rusty and flaking. |
While waiting for things to start arriving, I've totally pulled down the motor and started blasting the cases (the previous owner sanded and polished them as well as added a few extra holes). After welding up and grinding the "extra" holes, the case was blasted again. When the cases were all blasted (including the transmission), they were then run through the dish washer for final cleaning.
 |
Running the parts through the dishwasher. |
I have also started to work on the transmission (Feb 24/06). I've emptied out all the parts from the case including all the shifting mechanizm. Because this bike will be hand-shift, I have started to look over the shifting mechanizm to see what work will need to be done to achive this. I have a good case and what appears to be some good gears but the cover looked like it might be a problem, a piece was missing. The person who couldn't get the transmission apart tried a little too hard and broke a chunk out of the case at the output flange. I figured "what would it hurt" to try to repair the cover I had nothing to lose and a cover to gain.
| The transmission cover after welding. |
It went very well, I built up the case with weld then ground it down with a dremmel tool and various files.
| The finished cover, too bad the repair will be hidden. |
I ordered some "bar end" levers from a place called "Blitz Bikes" and they arrived today (Feb 27/06)! Sadly, they just didn't work out. They proved to be just too frail and broke soon after I tried them. The levers I ended up using, I cut from sheet steel, filed to shape and had polished and chromed. Each lever took the better part of 8 hours to make. The cables proved to be a little too crude for my liking, so, instead of messing with them, I just made my own. Tomorrow I'm going to go up and visit Steve at Beemers and More to see if we can work a deal for some parts he has.
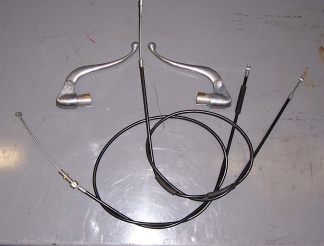 |
Bar-end levers and cables, waiting to try-out. |
After a visit with Steve, I brought home a frame and forks from a '62 R-60 to strip some parts off. I ended up taking both wheels, the rear drive and the speedo. The thing is though, after the parts were home, I wasn't any longer sure I needed them! Oh well, I've got them now. I suppose if I end up not using them I can always sell them again with a feeling I would at least get my money back.
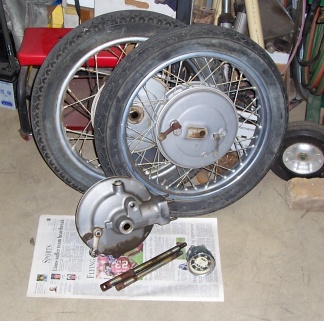 |
Wheels, rear drive and speedo, I just don't know if I'll use them. |
By March 3/06 the box of parts I ordered from Uli's in Frankfurt, Germany had arrived. I was quite excited to get this order as it had all the crank parts and now (as time allows) can start pulling down the crankshaft. In the Uli order was also some parts that you just can't get anymore like the rear main bearing holder. The old bearing holder had suffered from a bearing spinning in it making the hole way too big. I am still working out the modifications to the transmission but, at least I now have pretty much all the parts to put together both engine and transmission.
Looking at the fenders of a 1928 BMW R-47, they look rather flat with not much skirt. The fenders I ordered from Cyborg Cycles look like they will be a fairly good match. I will use one fender for the front and about one and a half for the rear. The rear fender may need to be extended a few inches before a hinge is fitted, we'll see. Once the frame and forks are built I can start looking at ideas on how to aproach the fenders. The rear fender will be crowned with a rack of some sort but haven't decided if it should be formed from sheet steel or tubing.
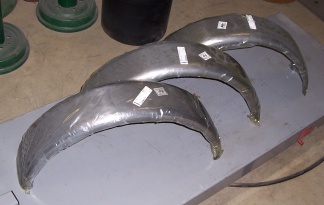 |
The three fender blanks. |
I have also been looking at different styles of handlebars. The bar that seems to come fairly close is called a "Bikini Beach" bar. It's a wide bar (34" to 36") with a small rise (about 3" to 4") and has very radiused bends. Giving the handlebars that very "round" look. I will have to drill holes in the bars for the cables and wires. Right now I'm figuring on having the throttle controled by lever rather than a twist grip. I've tried to find a suitable lever but it's looking more like I'm going to have to make one.
I want to use the same sort of forks as the old bikes had (leaf spring) but comming up with a suitable leaf spring may be a problem. I called a friend in Denver to see if he knew where I could find one. Gene told me that they were kind of hard to come by but that he would be willing to loan me one to use as a sample. His sample came from a 1928 Indian Chief. I tried taking the leaf up to a place in Fort Collins to see if they could make one like it. Eddie seemed familliar with them so I left it with him to see what he could do. Well, after three weeks of nothing, I went and got the spring. I was afraid if I left it too long it may get lost.
In my usual poking around, I found a Scout leaf spring on ebay. Following it to the end of it's auction I was able to secure it. A leaf spring from a 1927 Indian Scout. It's a little rusty but nothing that will be a problem, mostly just surface rust.
 |
The leaf spring from ebay. |
Rummaging through some of my old parts, I was astounded by comming across a pair of really nice heads! I couldn't believe my good fortune, I sat for the longest time just staring at the heads trying to find something wrong with them. Just to be sure, I took them apart, cleaned them in solvent then bead-blasted them. Wow, they almost look like new heads! The final touch, (to help get out any left over glass bead) the dishwasher.
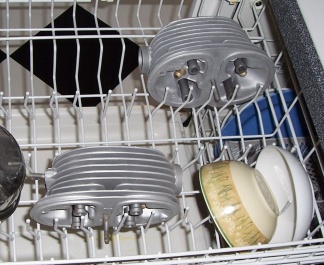 |
The final step in the cleaning process, the dishwasher. |
Spent this last Saturday pulling apart all the transmission shafts, cleaning, lubing and replacing bearings as necessary. Most of the time was spent just sitting and scraping off all the dirt and rust. All the bearings were locked up, so all the bearings were replaced. All the bushings, washers and gears looked good after scraping and cleaning. Only one part looked really bad, the output flange.
 |
The rusty output flange. |
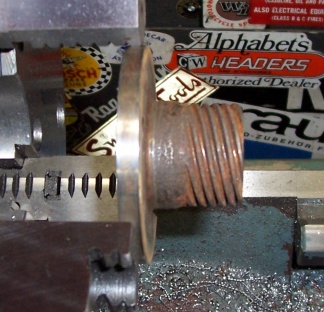
The output flange had rusted to the point the seal would be torn up as soon as the flange started turning, so I turned it down just a smudge on the lathe then polished the sealing area. A little smaller but feels like it will seal just fine.
 |
The seal area after turning and polishing. |
When all the shafts were fit to the transmission case, the bottom shifting fork was in need of adjusting. Back out with all the shafts and the fork was "adjusted" in the press.
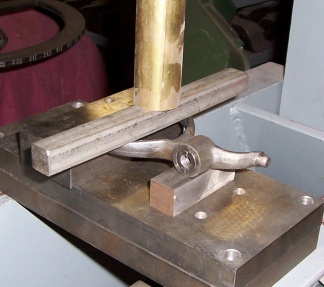 |
Adjusting the shifting fork. |
Next time in, everything looked good. Shifting gears just the way I designed it to, next step is shimming and cover.
| Shafts in, shifting good, ready for shimming and cover. |
The transmission is now all buttoned up and ready for service. All went smooth, shimming, slipping the cover on and even finding enough 6mm nuts to seal it up. Tapped in all the new seals and tightened the drive flange. The only things left to finish out the transmission are making a kick start pedal and the shift linkage. Finished the transmission 03/12/06.
| All dressed up and nowhere to go. |
With the transmission out of the way, what can I do next? I thought it would be nice to get the heads done, seeing as I have all the parts for those it should be an easy task. I don't have the equipment for the head work so I'll take them up to Acme in Fort Collins. Parts for the heads were fairly painless as I had most of the parts sitting in my stores. The only parts I had to get was the exhaust valves. I'll have Acme put in hardened seats to better deal with the unleaded gas. I was going to wait for the cylinders to come back from the painter but what the heck. While I'm up in Fort Collins I'll drop off the two wheel rims at the sand blaster. That way they will be ready for the painter. I'm not really having these parts painted, they're being powder coated. I've never tried having these kinds of parts powder coated before, a bit of an experiment.
I just can't put it off any longer, time to start doing the crankshaft. Each time I do a crankshaft it's a little different, so, the last time I did one I took photos and wrote down how I did it as I went along. After moving things about in the garage, the crank is ready to be addressed. Out came all my notes and photos, I even kept all the crank tools I made, all in one spot. To make sure the crank is as it was before taking it apart, make notes on all the dimensions. Notes read,..... check. Dimensions taken,..... check. Time to rock and roll.
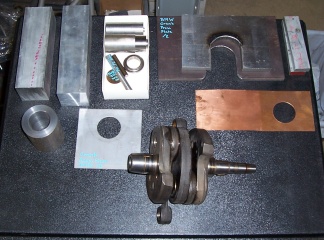 |
The crankshaft laid out with all the tools, the doctor is in. |
I took a little longer than I usually do to rebuild a crankshaft because it's been a while. Taking the time to read all of my old notes before pressing to get well prepared. A couple of new tools had to be made to deal with the variation in sizes from one crank to another. Even so, I'm happy to report the crank was back together by 03/18/06.
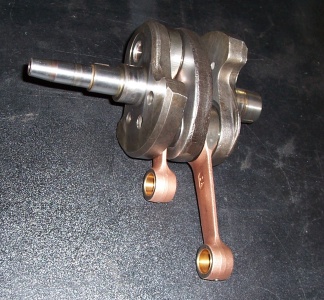 |
The finished crank, new pins, rods and rollers. |
I was able to press the crank together with only .004 run-out, I tried to lessen that but it just didn't matter what I did I just couldn't get it any better. Happy with the .004, the bottom end is now all together 03/19/06.
Putting together the bottom end went pretty smooth. Funny how things work out, all these years I have always had a few gaskets for the little cover for the tach drive so I didn't order one. Now that I'm ready to fit that cover, not a gasket is to be found, how typical. When I got to the clutch, I remembered how ugly the plates were when dissassenbled. The plates were scored from clutch dust that couldn't get out. In order to allow the dust out, I cut troughs in the plate using a 1/2 inch milling cutter. The plate is quite heavy so I'm pretty sure warpage won't be a problem (but I'll keep my fingers crossed).
 |
My clutch plate modification. |
This weekend 30/18/06, I finished getting together the rest of the bottom end. Even put in the clutch and fit the oil pan. The hold up for going further will be the cylinders and heads.
 |
The bottom end done, my daughter calls it "Baby Beluga". |
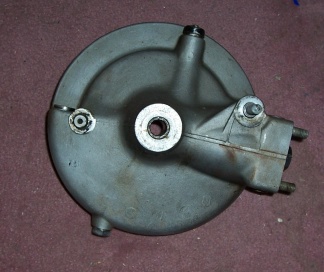
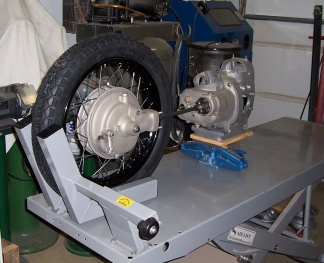
I decided to go with the rear drive I got from Steve, this way I can retain the rear wheel from a /2. The /2 drive shaft will mate with no problems as I have one in an old swing-arm. This way, the speedo that I already have will be suitable rather than having to do some experimenting.
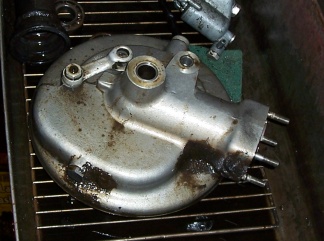 |
The rear drive in the midst of cleaning. |
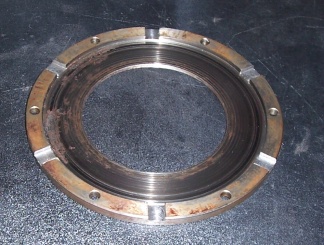
This rear drive is in need inspecting as well as all new seals, judging by the HEAVY coat of oil clumped dirt. After cleaning, the crown cover on the inside was found to be discolored, saying to me that it has gotton very hot at some point. Was the heat caused by the oily and worn out brakes or was the rear drive run too low on oil? Questions only the inspection will answer. I took off the worn out brake shoes, I will be sending them to Ed Lipe to have them relined.
I dug through my gaskets and found a shaft gasket and a crown gasket, I'm yet to prove if the crown gasket is the right one. I also found a new axle seal and crown seal, goodness knows how old these "new" parts really are though. I didn't find a pinion seal but in all honesty, I'm not real worried about that one. A little more detective work reveiled that I had 3 new pinon seals.
When the rear end was apart, all the parts were cleaned and inspected. The only real problems were hard seals. Seeing as all the bearings were out, I further cleaned the housing then bead blasted the outside (to make it look pretty). With all the tape removed (I used duct tape to keep glass bead from entering certain areas), the drive housing was put through the dishwasher. From there the rear drive was re-assembled.
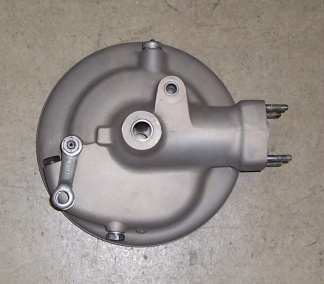 |
The finished rear drive, ready for action. |
The rear drive was finished 03/30/06. I still need to get a new drain plug for the rear drive as the old one is a mess (the old owner's favored tools must have been plyers and Vise-Grips). The old one is being used to close the drain hole for now but that's all. Turns out the new crown gasket I had was the wrong one so I had to re-use the old one. If it gives a problem down the road, it shouldn't be hard to replace.
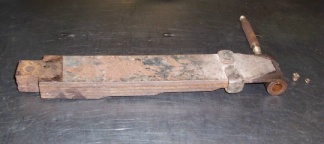
Today I removed the shaft from an old swing arm I've had hanging from the garage rafters for the last twenty some odd years. I've always had trouble pulling the coupling bell off and this one wasn't any different. The first puller I tried, broke, so I used a large bearing separator in the press. It was a little scary as I had to push the press to it's limit before the big "POP."
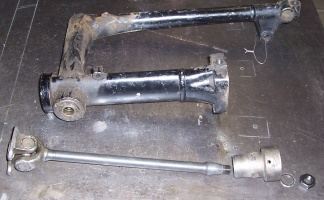 |
Shaft out and ready for a new tube. |
My intention is to make a new tube for the shaft to run through rather than trying to use the whole swing arm. I guess I could just cut off all the swing arm stuff and just use the old tube except that would mean ruining a good part.
Over the past weekend, I ordered a seat off Ebay for this project. A black leather solo seat for a Harley Police bike. I haven't ordered any springs for the seat as I want to see how the frame comes out (04/01/06). The bar end levers dictate that I use 1" handlebars (of which I'm not completely satisfied with what is available) and may well see me trying to make my own. I've also been doing some searching for a suitable horn. Because the horn will be very much out in the open, I'd like to get one that has the right look for the vintage. A reproduction horn will cost in the range of $200 to $250. The horns I've been looking at are in the $40 to $50 range (40s and 50s Willys horn).
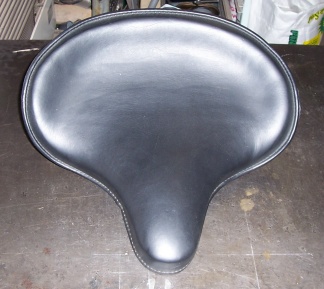 |
One comfortable looking seat. |
On April 7th the seat arrived, it's a very attractive seat indeed. I will wait now until the frame is being built before I buy seat springs. The cylinders are now back from the powder coater and have been sent to Acme for boreing, they are pretty busy up there as the heads haven't been done yet either. I found some tube that the shaft drive can pass through easily and have been fabricating a "bell mount" for the bevel drive. This bell mount has taken a lot of time to make as I started with a lump of solid steel 4 inches in diameter.
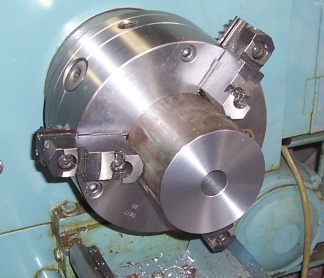 |
The bevel mount after drilling and faceing. |
After drilling and faceing, the ends were turned and bored to suit the drive shaft coupling bell and shaft tube. The sides were then tapered to suit the bevel mount and the inside bored to match, then a counter bore added to allow for the back of the shaft coupling bell.
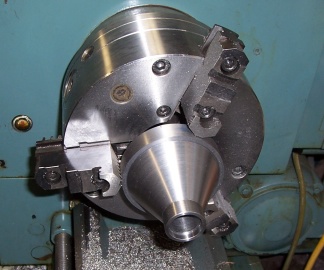 |
The turned bevel mount. |
The bevel mount now will have to be drilled, milled, cut and shaped to suit the mounting platform on the bevel drive. A lot of work for such a simple part (well, sounds simple anyway).
Got the wheel rims back today (4/13/06), they look really nice, expensive but nice. Seems there was a problem with the rust on the rims, it kept bubbling up when the rims were heated. I had the rims done by K&K Painting in Berthoud (pronounced Bur-thud). Acme said the cylinders will be ready this afternoon but not sure about when the heads will be done. I'm still waiting on the order from Vietnam with the spokes and such so I can get the wheels done. With the weather outside all warmed up, I haven't been able to spend much time on the bike as the yard and house have been demanding attention.
 |
The newly painted rims, very pretty! |
Just got my heads back from Acme! They look just the way I expected them to. Don tells me the seats have already been changed at some point as they are hard. That made things a little easier and cheaper to boot! I still haven't see the stainless parts I ordered from Vietnam, it's been six weeks now (05/07/2006), just a little slower than the two weeks when I made the order.
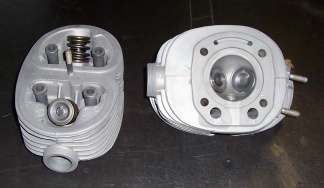 |
With all new innerds, the heads are ready to run. |
The stainless parts arrived 05/18/06, talk about your slow boat! I'm going to have to just tuck the stainless parts away until I've got the hubs done. The bike will have a /2 hub on the rear and a /5 hub for the front. I've got the hubs cleaned and the bearings removed, looks like all the wheel bearings are going to need to be replaced. With the wheel completion in sight, I guess I'd better start looking at tires.
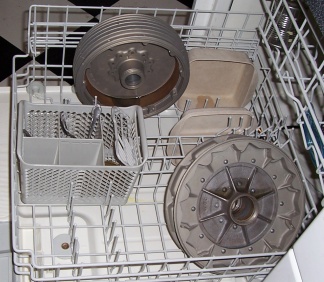 |
The last step in cleaning the hubs, the dishwasher. |
I think the next step here is to overhaul the wheel bearings, put the bearings back in the hubs and start lacing the wheels. Once the wheels are done I can start mocking up how everything will sit and start designing the frame.
More work on wheel stuff, I got the bearings locally and ordered the seals from a place in Denver (Rocket Seals) as well as Capitol Cycle. Today (May 31/06) was spent repairing the hub nut for the rear wheel. After the repair was finished, I re-plated the nut in the bathroom sink (using one of those little plating kits from Eastwood).
June 3, 06 I was able to lace the rear wheel. The rim was one of the early ones where-as the hub was a late one, so, spokes all press hard on one another where they cross. It's irritating but just the way it is, I don't have any other rims to fall back on so I just have to accept it and keep moving forward. The rim has a spot in it that couldn't be tuned out, although it has a little burble, I really don't think it will affect the ride.
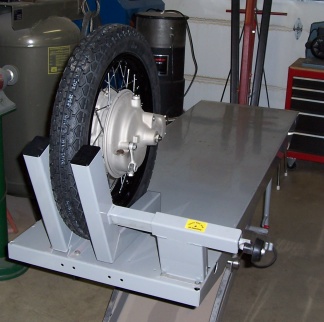 |
The
finished rear wheel with tire and bevel drive fitted. Don't you just love the look of painted rims? |
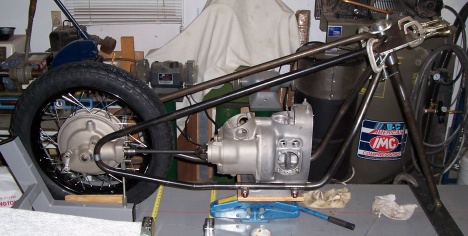
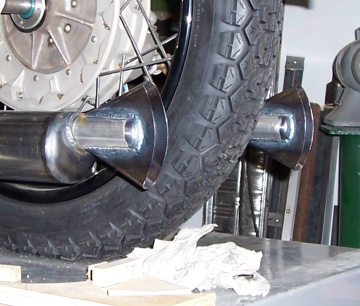
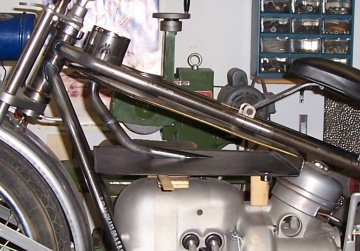
I have clamped the rear wheel on my bench to start visualizing how the frame will look. Next step will be to level and square the wheel, set the shaft, transmission and engine block in their respective positions then start fabricating fittings. There are places in the building of a bike that create their own excitement, for me this is a big one.
 |
Mocking up the component positions for designing the frame. |
July 29, 06 I've been out in the garage a little bit each day but not really enough time to make much headway. I managed to push past a couple of minor roadblocks and was able to cut and bend most of the main frame tubes. Starting to look like a bike now, next will be to disassemble everything and prep for welding.
 |
The basic frame tubes, held together with clamps and duct tape. |
August 4, 06 Been spending as much time as I can out in the garage but that means only a few hours at most per day. The frame is now all tacked together but I still have a number of fittings to make. The forward half of the rear fender is now being held in place waiting for a hinge to be fabricated. Bending the tube between upper and lower rear fender mounts was a little fussy but is now bent, mitered and tacked in place.
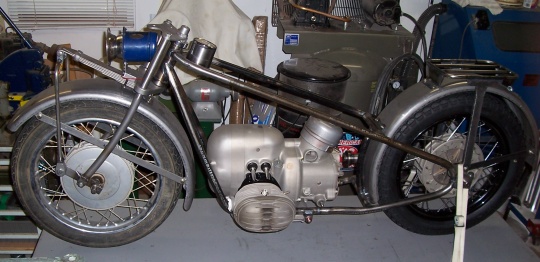
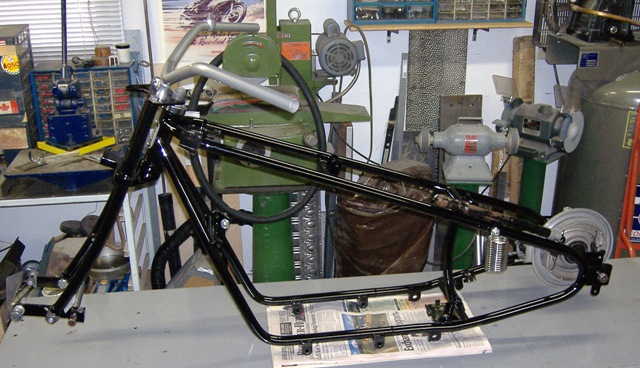
August 28, 06 With the frame all welded I have been moving forward on the forks. Both upper and lower yokes are finished and in place, I've just straped the front wheel to the bench just to be able to see how everything was going to line up.
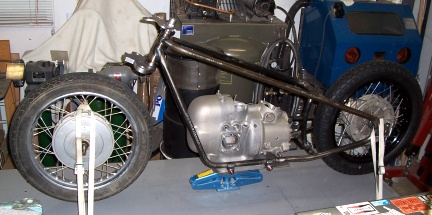 |
The frame all welded and the yokes in place, time to start looking at the forks. The front rim is chrome because the wheel hasn't been rebuilt yet. |
September 4,06 I've been playing with the forks for a few days now and I've got to say I'm not yet totally happy with the way they are comming out. The material was cut, turned, a threaded bushing welded into the tops of each leg, then bent. The curve came out quite well considering the equipment I have available to work with, they might just be a bit too long. I've moved the bike around a bit to try to get the best "sweet" spot for everything to be happy. After the spring was put into it's place on the lower yoke, the wheel no longer had enough room to move up and down and left no room for the fender at all. Moving the wheel forward seems to have cured the room problem but may cause the steering to be a bit slow, I'll just have to wait and see.
September 19, After a few fits and starts, I think I've finally found the happy medium for the forks and front wheel. I made some fork legs that took the wheel forward but the rockers made the spring too responsive (squishy). I settled on fork legs that only had a slight bend in them and raised the front of the bike just a smudge to allow useable space between the wheel and fender.
 |
The almost completed forks, fender trimmed and in place. |
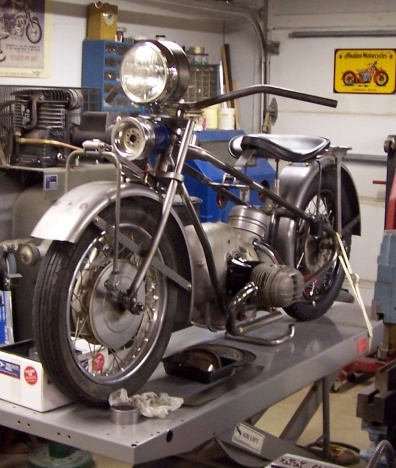
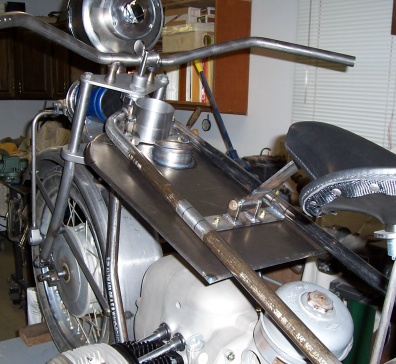
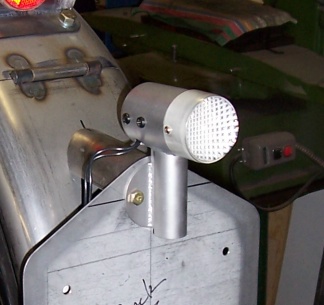
November 2, work on the bike has slowed a bit because of other things needing to be done. Even so, I have been able to get the rear fender mounted, the rack made, the drive shaft tube made and the speedo mounted. Because the speedo has it's cable coming into the back side, making the gas tank will be a little more chalenging.
 |
Moving right along, the horn looks a little funny but I'm hoping once the headlight is on, it will blend in better. But, as you can see, still lots to do! |
I have started working on the steering again, this time to create a steering damper with the lock stops incorperated. The way the forks are right now, they stop against the frame. Once the frame is painted, having the forks stop against it will cause the paint to chip as well as looking like poor design.
By mid-November the steering damper, fork stops and knob were all worked out. Everything is all machined into the damper unit and bolted to both the lower yoke and the frame. The "key" knob is a little weird looking but "just" the look I wanted. I also drilled the shaft for a cotter pin so the knob can't be backed out too far.
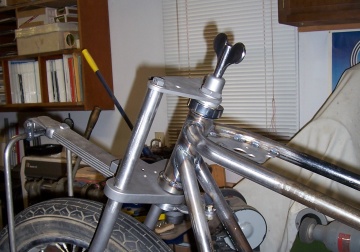 |
The "key" knob looks a little later but just what I wanted! |
Here it is December and the bike is still not able to hold itself up. I need to make a stand for it in case I need to remove it from the bench. I want to have a side stand just for conveinience but a center stand is also necessary. To make the center stand, I utilzed 4 ninety degree weld fittings with some straight sections of pipe in between. I don't have the pivots and such worked out yet but it's slowly coming together.
 |
The start of my center stand. |
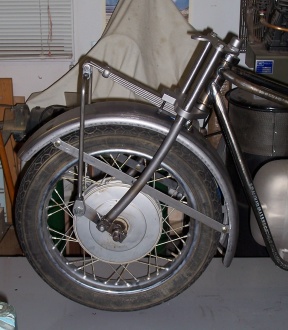
Another thing I've been working on is the front brake. I was going to try to use the front brake plate I already had but it just isn't working out. The brake plate I had was for earls forks and well, looked kind of bad. I tried to think of ideas to integrate it but I instead opted to go with a brake plate from a tescopic fork. I like to have a floating front brake so the suspension doesn't load during brakeing, causing the forks to either dive or raise depending what kind of forks they are. A floating brake will leave the suspension to do it's job no matter how hard the brakes are applied.
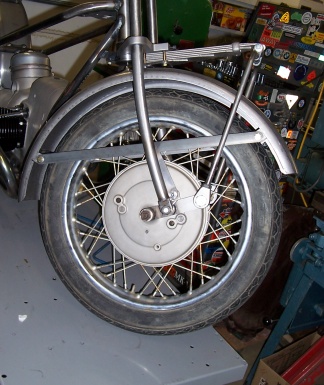 |
Floating front brake plate now in place. |
February 12, 07 Now it's been a year since I started this project. The bike is looking pretty complete with the exception of things like the gas tank, seat and an electrical system. These things are slowly being done with enfasis on the "slowly." I ordered an old headlight on ebay but didn't like the way it was working out so I went back to the first plan of cutting the front off an aftermarket Harley headlight and making a new bucket. After a lot of cutting and forming, this is what I ended up with.
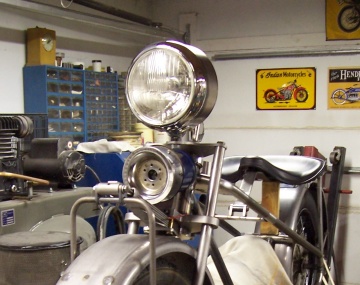 |
Kind of big but close to what it would have been. I still have to mount an ignition and light switch in the bucket. |
As you can see by the photo above, I've also started working on the seat mount. I tried the seat with just a couple of springs but it just wasn't enough. What I ended up doing was making a spring plunger for under the seat.
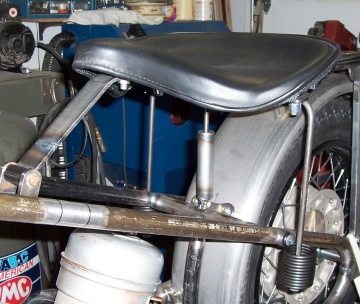 |
Seat mounting going forward. Note the plunger underneith. |
The plunger helps against bottoming out but I think I'm going to have to remake it at some point, the spring just isn't quite strong enough yet. If I have the riding position leaning slightly forward, it might be ok.
 |
A view with both seat and light mounted. |
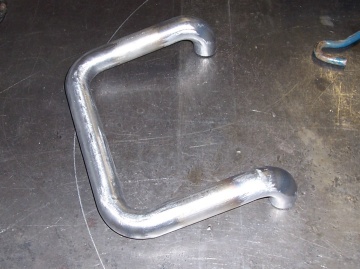
This, the last day of February (2007), I finished the handle bars, ..... well, sort of. I tried to figure out how long the blank needed to be, cut it to length, bored the ends (for the bar end levers) then started figuring the bends. I've never made handle bars before, these are my first. When the bars were bent to about where I wanted them, material was cut for the mounts. I welded the bars to the mounts, so, I hope they are in the right spot!
 |
With the handle bars added |
To finish the bars, I still need to drill the holes for the cables, wires and tap the holes for the switches. I have yet to come up with a good place to mount the ignition switch, I don't really want to put it in the headlight.
March 2007, Got the center stand finished. I ended up sawing up the last one I made to rob parts for the new design. I went with one that used a cross bar so mounting springs would be easier. The pivots were designed to allow the use of BMW /5 springs (only because I had a couple of them). All that's left on the center stand is figuring out how to put it down and to finish the "feet".
 |
The new center stand holding the bike up. |
A few other things I've been working on are the mufflers, tail light and headlight. The mufflers were put together from locally supplied exhaust tube and end caps made here in the shop. There is a full double reverse in the mufflers so, I'm expecting them to be fairly quiet.
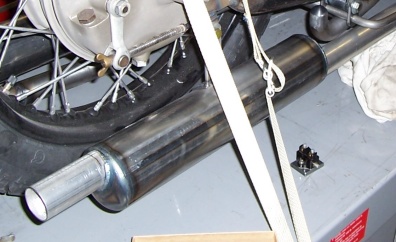 |
The mufflers, I'm considering adding fishtails. |
Continuing work on the head light. After grinding, the next step was to mount the ignition and indicator lights as well as make a removable cover to hide the wires and such behind.
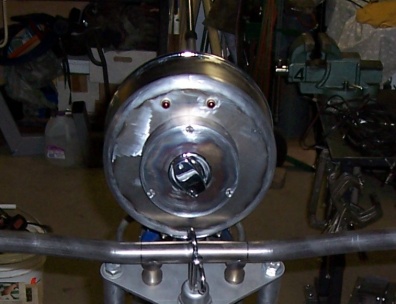 |
A view of
the headlight from the rider's seat. Ignition in the center, two "idiot" lights above. |
The tail light and license plate mount has been a problem to get just right. The desire to use LED lights for the tail light is very apealing for the "being seen" factor. At the same time, trying to keep the light small to suit the year the bike will be portraying.
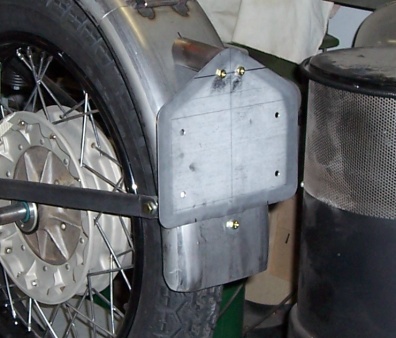 |
The start of the tail light/ plate holder. |
April 2007 finds me starting to work on the gas tank. With nothing to use as a sample, I've just started cutting posterboard until a satisfying shape presented itself. The tank has to be made as deep as possible but at the same time shallow enough to get in and out of the frame.
 |
The gas tank starting to take shape. |
May 2007 I haven't gotten any further on the gas tank, instead, I went chasing after the tail light and mufflers. I had an idea on the tail light and wanted to pursue it. My idea was to make the tail light using an LED bulb with a standard mount. The size and length of the bulb dictated the size and shape of the tail light itself. The lens was shaped from acrylic rod, the holder turned from steel round stock and the tube from inch and a half exhaust tube.
 |
The completed tail light |
The tube below the tail light body (the mount) will house the license plate illumination light. It too will be an LED bulb with an acrylic lens.
Next up, the mufflers. The mufflers were pretty much finished except for the ends. I have seen old photos that show the mufflers ending with either a fishtail or just the pipe ending. I liked them both but have never made a fishtail before, so, that's the direction I opted to go. I have to tell you, they wern't one of the easiest things I've ever made. My first attempt ended up in the trash can. These were the next try.
 |
The finishing touch, fishtails |
It's been a while since I last worked on the bike because of summertime needs (rides, relaxing, meeting new people,..... you know, important stuff). Here it is the start of September, so time to get back at it.
September 03/07, when the neighbors moved out (wasn't my fault,..... really), they gave me a small, sealed 12 volt battery. I didn't think it was going to be any good as it was so dead I couldn't even get the ohm meter to register. Just for fun I thought I'd put it on charge to see if there was any life left in it. To my surprise, the battery came right up! Because of it's size I thought it would be the perfect battery for this bike, I just had to make it look like it belonged.
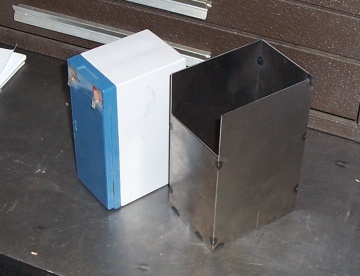 |
The battery beside the startings of the box. |
I cut out some foam, sheet metal bits and phonolic to put around the battery to try to make it look like it belonged,.... what do you think?
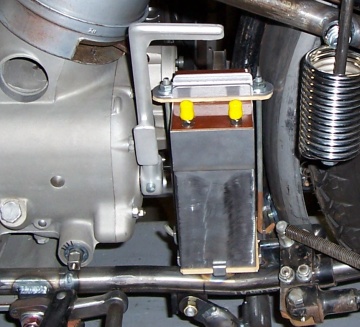 |
The
finished battery box and mount. The yellow caps are insulating the terminals. |
Of late, I've been again working on the gas tank. I bent up a tube to run through the tank for the speedo cable, tacked the bottom panel in place and am now ready to start the sides.
 |
The open tank showing the speedo cable tube. |
I forgot to mention that I have been able to secure a set of the right seat springs, the little plunger or helper under the seat is no longer needed. It only took a year to find them.
Hand working the edges of the tank top and bottom, I started cutting the sides. The sides had to be made up of several parts, of course, can't forget the badge mounts. It just wouldn't look the part without badges.
 |
The gas tank starting to look finished. |
To get everything electrical working properly as well as looking the part of an old bike, I ordered all the "proper" wireing parts from Rhode Island Wireing. At the same time, I went ahead and updated the generator to 12 volt, using the fancy MZB alternator. After all, if I ride at night, I want to really see where I'm going.
While waiting for the wireing parts and electrical pieces from Germany, I determined Baby was ready for painting! Seeing as how it is an old BMW, there is really only one color to paint it,..... Black with white pin stripes.
 |
Fresh back from the painter, assembly begins. |
Before assembling the fenders and gas tank, they needed to be pin striped. I couldn't seem to find anybody in my area that could do pin striping, so I took a chance on a fellow in Greeley that was just starting to try his hand at the art. I explained what I wanted and he seemed to think it wouldn't be a problem, so I left all the parts with him. When the parts were ready, I wasn't real happy with what the pin striper had done. Instead of hand striping, like I had asked for, he masked and sprayed them. It wasn't what I had wanted but all in all, it didn't look all that bad.
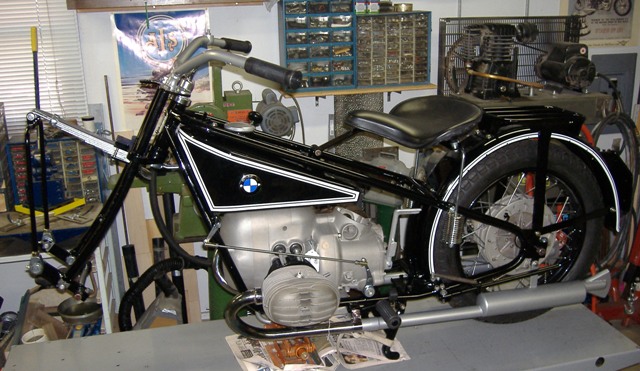 |
The striping isn't what I wanted but I don't think it looks all that bad, if fact, I think it looks pretty darn good. |
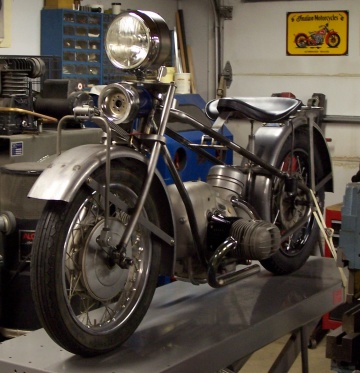
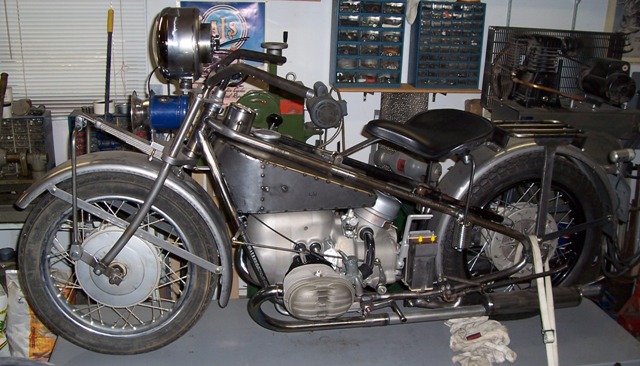
Bike assembled, wireing done,...... it's time for a ride.
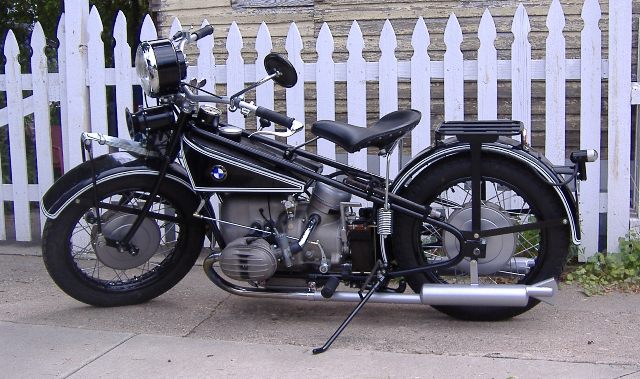 |
Baby ready for it's first ride. |
A complete ground up build, Baby didn't disappoint, started on the second kick!
Since that first ride, I have logged many happy miles on Baby. A sidecar has since been added but not just any sidecar, I had to make that too.
Copyright © 2012 Pokie Parmidge