Fuel Tank Removal
(Tank off!)
Pokie, Feb 2000
updated Oct 2006
Whether you only have to check the battery, put on a set of heated grips or change the fuel filter, at some point you are going to need to pull your tank. This is the method I use to remove the fuel tank. As with all things, there may be some errors but here goes anyway. It’s best if the tank has very little fuel in it, but the tank can be removed almost as easily full or empty. You have to expect to spill at least a few drops of gas, so be prepared. No open flames and no smoking!
First off, make sure your bike is sitting stable. It’s best if the bike is being held upright on a BMW service stand but it’s also quite possible to do without. Do whatever chalking or strapping is necessary to keep the front wheel and forks pointing straight ahead. If the forks turn while the tank is part way off, dents and scrapes may result.
|
|
Popping off the chrome side panels. |
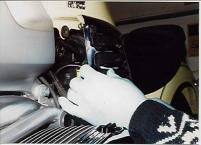
With those thoughts and pre-cautions out of the way, let’s get started. The two items I usually pull off first are the two chrome side covers. These are held in place by three knobs that slip into rubber grommets on the frame (two at the front and one at the rear). To remove these covers, tuck your fingers under the edges and pry out. Use slow, continually increasing pressure. If your covers have never been off, they may require a fair amount of pressure.
Next, remove the seat. This requires the removal of the two bolts (on the rear of each side). The two bolts require a 4mm hex key (often referred to as an Allan key) for removal. After the removal of the two bolts (watch you don’t lose the bushings that the bolts go through) be sure the backrest is in the “laid down” position or damage may result. To lift the seat away, lift the back of the seat while pressing down on the front. With a jiggling motion, slide the seat rearwards. (Pressing down on the front of the seat is necessary as the nose of the seat body tucks under the frame. This nose also has little rubber knobs on it and these rubber knobs tend to stick to the paintwork so that is why it has to be wiggled.) Once the seat is off, try to remember to put a smear of grease or Vasoline on those rubber knobs. This will make removal next time a little easier.
|
|
Removing the color panels. |
Now remove both color side panels below the seat. This requires a 3mm hex key. There are two bolts in each panel (keep track of which bolts go where along with any bushings or washers). Have a nice clean space prepared to safely set the color panels so no damage occurs. Just in case you forget which screws go where, the screws with the point and the silver washer go to the rear. The screws with the flat bottoms and black plastic washers go to the front.
|
|
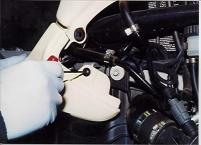
Removing the tank bolts. |
On the left side of the bike, undo the straps holding the tool pouch and remove the tool pouch (sometimes the tank will catch on the tool pouch as it is being lifted away). Remove the two bolts at the rear of the tank (one on each side). This requires a 5mm hex key. Keep track of all washers (metal and rubber). While removing the rear tank bolt on the right side, unplug the wiring to the tank. The tank plug has three wires (blue with white stripe, green with white stripe and lastly a brown). To unplug, pinch the top of the wings on the plug together and pull up.
|
|
Pinching together the little wings on the plug while pulling up will get the tank plug uncoupled. |
It’s time to face the fuel hoses and the drips. Before going further, look around; make sure there is a nice, safe place to set the tank down once it’s been lifted off. I find it really frustrating to lift off the tank and then stand there wondering where to set the darned thing down!
|
|
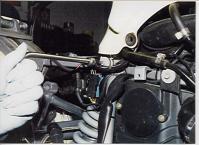
A pair of hose pinchers with one marked "Top". If you have a CLC or quick disconnects, you won't need these. |
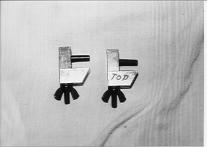
To go further you will need to have a pair of “hose pinchers”, (If removing the tank on a CLC or bike with "quick disconnects", these pinchers are not needed) I’d call them hose clamps but we all get the wrong picture in our minds when they are called “hose clamps”. These hose pinchers are available at any auto store for a few dollars, as they are commonly used on cars. My pinchers are made by the Lisle Corp. and carry the part number 22850, "Hose Pinchers" carried by "Pep" boys and "Checker Auto." Clamp off both fuel hoses with the pinchers about 1 inch above the existing hose clamps (to avoid pinching the plastic coated aluminum tubes). Be sure to use only enough pressure on the pinchers to stop the fuel delivery, not so much pressure so as to damage the hoses. I like to mark the upper hose pincher with a “TOP” note written with a felt marker so it gets back on the correct tube. It's important not to get the tubes mixed up as the bottom tube is the feed, while the top one is the return.
|
|
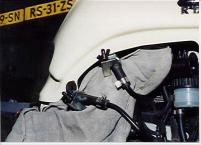
The tubes clamped off. The one on the left (or top) is the return, where as, the one on the right (or bottom) is the feed. |
|
|
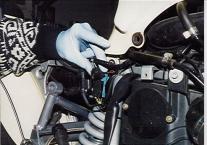
Undoing the hose clamps. |
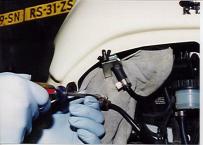
Take a screwdriver and undo the two hose clamps. You want them loose enough so they slide up the tube towards the pinchers. If you opt to completely remove the screws from the clamps, be really careful as some of the clamps have “floating” nuts that may be lost. Don’t push the hose clamp off the end of the rubber hose and onto the plastic coated aluminum tube, because there is a good chance they will disappear down under the air box.
|
|
The "dribbles". |
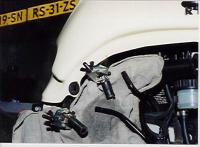
Remove or withdraw the fuel tubes from the rubber hoses. If they are really sticky and refuse to budge, lubricate a dull probe with oil and force it up between the fuel tube and the rubber hose (I use a very small slot screwdriver that has had all sharp edges dulled with a file then sandpaper). While the dulled probe is in place, squirt in some WD-40 or the like. Once the probe is removed, the tube will be more willing to be slipped out. Don’t be too rough with the fuel tubes, as they are not easily replaced. When the tube and the fuel hose part, there will be a small “squirt” of fuel. The amount of fuel will be small but can squirt a long way so protect your face and eyes! Check the rubber hoses for leaks and tighten the pinchers further if needed.
At this point, the back of the tank needs to be propped up with a small block of wood. Watch the front of the tank doesn’t come in contact with the frame. Just beneath the back of the fuel tank there will be two black hoses visible. One hose goes to the charcoal canister, while the other hose goes through a couple of loops then to the ground. Undo the first hose from its “barb” connector just ahead of the canister. Withdraw the second hose from its loops and allow it to dangle at the side of the motorcycle.
The gas tank is now ready to lift away. Lift the back of the tank slightly and slide the tank towards the rear. Lift the tank away slowly in case any of the hoses or wires gets snagged. Once clear of the motorcycle, carry it to the spot you set aside for it. When setting the tank down, watch the hose pinchers don’t come in contact with the paint. To put the tank back on, simply follow the reverse order. If the tank doesn't slip on the rubbers at the front easily, smear a dob of dish soap on the hook at the front of the tank on each side.
See, with a little care and attention, there are not many jobs you can’t do!
Copyright © 2009 Pokie Parmidge