Idle Plug or Idle Jumper
Pokie Parmidge 2017
The earlier BMW R1200C Cruiser had quite a low idle and would often die at a stop. To cure this, BMW came out with an "Idle Plug" that you or your dealer would insert into the relay bank in your electrical box under the Motronics unit. Of course that would mean a trip to the dealer to have your "High Idle Plug" installed. Well, upon inspection, that High Idle Plug is nothing more than a jumper that could be made and fitted by anyone with mechanical abilities. The purpose of this writing is to show you where the socket is and what sockets to join to achive the higher idle the plug produces without the expense of buying the plug itself.
Items you will need to jump the contact points are two unisulated spade terminals and a short (about 2 inchs long) piece of 16 gauge wire. Because the wire is doing a job all by itself, pretty much any color of wire can be used. Strip each end of the wire and crimp or solder a spade terminal on each end of the wire.
Now comes the hard part, putting the jumper wire in place so it can start doing it's job. First thing you will need to do is remove your fuel tank. Now if you're not sure of how to take your fuel tank off, please see my article Tank Off!. At this point, the most important thing you can do is to DISCONNECT the negative battery terminal (don't want any unintended sparks!).
With the tank off and the battery negative or ground disconected, next step is to remove the motronics plug and box. The socket for the idle plug is in the electrical junction box, under the Motronics unit. Start off by clipping the tie strap that holds the wire running beside the Motronics unit. Unplug this wire by pressing in the metal clip on the plug and pull the joint apart. Just let the two ends dangle.
Next, unplug the big plug on top of the Motronics unit. The first time you unplug the Motronics unit it is a little bit tricky, but the next time it will be easy. Pull the metal clip out (on the right side) with your middle finger and push the plug up with your thumb. Continue lifting the right side of the plug until it is almost clear of the socket. Now move the whole plug to the right side to unhook it from the catch on the left. Once the plug is clear of the socket, just let it dangle as well.
To get off the Motronics unit, remove all four philips head screws at the edges, (there is a ground wire under the front left mounting screw, so make sure that it gets put back when reassembling). When all four screws have been removed, the Motronics unit can be carefully lifted away. Set the Motronics unit where it won't come to grief, being extra careful not to drop it!
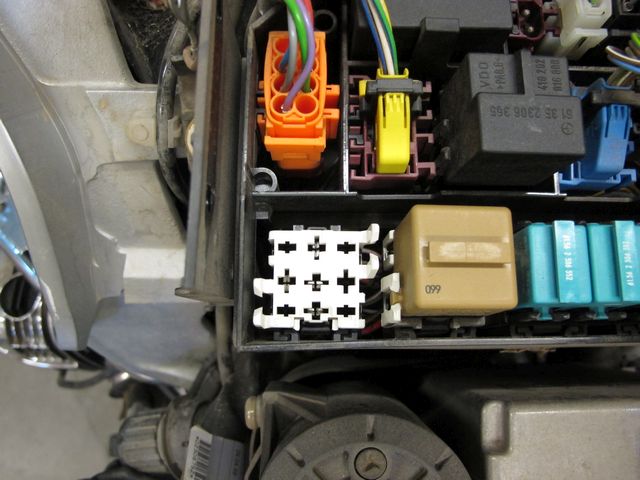
Under the Motronics unit, you will see a big black box resembling a battery: this is the electrical junction box. After lifting the top off the junction box, you will see a maze of wires. Along the bottom or back of the junction box will be a bank of relays with a blank socket on the left side. This blank socket is where the fast idle plug or jumper goes.
|
A look inside the wiring junction box. The white socket in the lower left corner is where the idle plug goes. |
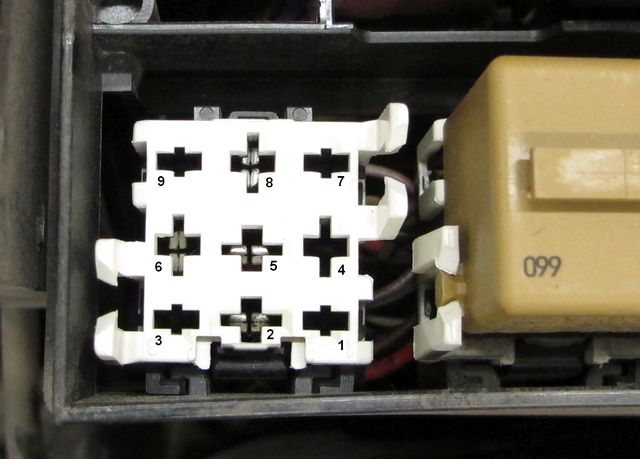 |
I have numbered the locations on the plug. |
Using the numbers on the plug, the jumper wire needs to be plugged between the numbers 2 and 6 locations. Once the jumper wire has been plugged in, refit the top of the junction box and the Motronics unit (did you remember that ground wire?) If you forget which way the Motronics unit goes on, just remember the metal clip for the big plug on top is at the right. Hook the Motronics plug on the left and press it down. If the plug doesn't slip in fairly easily, back up and try again. Press down the plug until the metal clip "snaps" or "clicks" into place.
Re-attach the little plug and socket beside the Motronics unit and strap it back into place. Before you are completely done, you need to make the computer recognize the new map. This is done by turning the ignition on and off a few times while the battery is disconnected. You are doing this to be rid of any possible electrical charge in the system. With no electrical charge left in the system, when the computer re-boots, the new map will be recognized. You may now re-attach the battery ground. If all is going well, refit the gas tank as well and call it done.
Performance changes
When you restart your Cruiser, all will seem the same in both running and idle speed. Where the real difference occurs is when you start riding. With the Motronics reading the new map, when you close the throttle, the return to idle is no longer instantaneous. The new map will instead return to idle in steps, stopping the decceleration from going past idle and into the stalling zone. Kind of reminds me of the "dash-pots" my old VW had.
Copyright © 2017 Pokie Parmidge