Removing and Refitting Your Shocks
Pokie Parmidge
January 2004
I'm often asked how to get the shocks on and off, well, here's how I did mine. The easiest shock to change is the rear one, so I guess that's where I'll start.
Rear Shock:
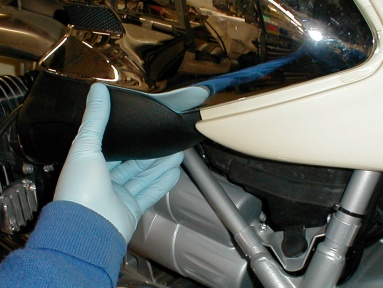
The weight had to be taken off the rear wheel in order to get the shock off, so I started by strapping the front of my cruiser down and in an upright position. To access the shock mounts, the chrome side panels will have to be removed.
|
Pop off the chromcovers with your fingers. |
The seat comes off next (requires a 4mm hex key). Once the screws and bushings are out, press down on the front of the seat, lift the rear and "scoop" the seat off. The little rubbers under the nose of the seat will sometimes stick to the frame so some wiggling may be necessary.
 |
One screw on each side holds the seat on. |
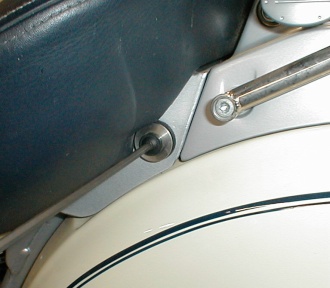
Then the color panels are removed (needs a 3mm hex key).
 |
Two screws on each panel, don't lose any of the washers. |
With all those off, it's easy to see the shock mounts. Before trying to undo the mounts, the weight has to be taken off the rear wheel. I used a small scissors jack and a piece of plywood under the rear of the motor to lift the back wheel. Another really good way to get the bike's wheels up in the air would be one of those ATV jacks, but alas, I don't have one.
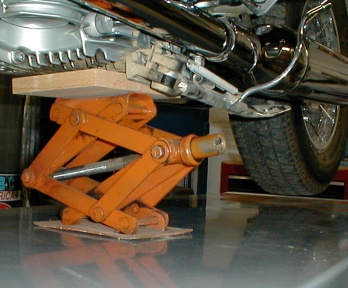 |
Jacking up the rear wheel. |
The lower shock is the easiest one to get at so I went after that one first. From the left side, I used a 14mm socket on a long extension and ratchet to undo the bolt while holding a 15mm box-end on the nut or back side.
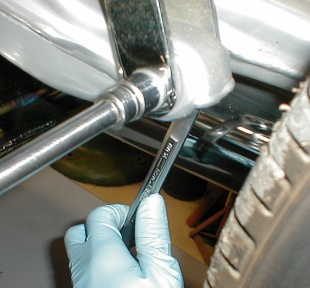 |
Undoing the bottom mount. |
I removed the nut easily but found I had to lift the back wheel (with the help of a small pry bar) just a tad to slip out the bolt.
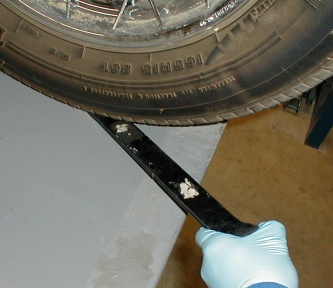 |
Lifting the rear wheel with a pry bar. |
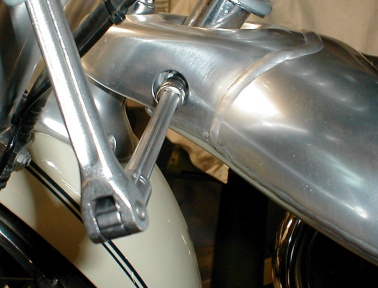
Using the same tools, I undid the nut and bolt on the shock upper mount. Before pulling out the bolt, I went ahead and put a few strips of duct tape on the bottom edge of the rear fender just in case I bumped it while removing the shock.
To get the shock out, the top of the shock will have to move into some of the space the charcoal canister occupies. I found it pretty easy to simply push in the plastic clips on either side of the canister and push the canister up and out from between the frame members. The canister only has to go up a bit so there is no need to undo any wires or hoses.
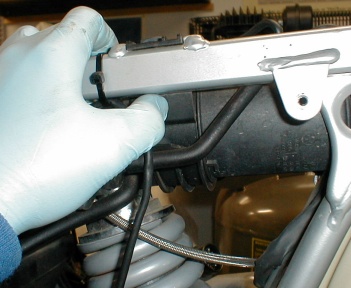 |
Pressing in the plastic clip with my thumb. |
To get the shock out, I just lifted the shock, slid out the bolt. Rocked the shock back until the top had cleared the upper mount, lifted the shock up to clear the lower mount, twisted the lower part of the shock towards me, then down and out. Lift the shock out over the muffler, being careful not to contact the muffler.
 |
Lifting out the rear shock. |
To put the new shock in, it's pretty much like working backwards. Lift the new shock in over the muffler and stand it up. I poked the top into the area the canister had left open and lifted the shock high enough to slide the bottom over the lower mount (if the new shock is a BMW item watch the little knob at the bottom of the shock faces the rear, this puts the adjuster on the correct or left side). I then rocked the top of the shock forward and slipped it in and up into the upper mount and slid in the bolt, (grease the shaft of the bolt to stop it rusting to the shock eye) the upper shock bolt is the shorter of the two. To get the lower shock mounting bolt in, again I resorted to using a small pry bar to lift the rear wheel (again, grease the shaft of the bolt). With both bolts in, thread on the nuts and tighten both mounts. Snap the charcoal canister back down between the frame members, refit the color panels, seat and chrome side panels and that job's done.
Front Shock:
Replacing the front shock isn't as easy as replacing the rear unit, but the sooner I get started, the sooner I'll be done.
Start off with again holding the bike upright but this time straping the rear of the bike (I used the rear frame loops, not just the rear footpeg loops). Next off is the fuel tank, at first I thought I could do this job with it on but finally gave in and pulled it off anyway. Before jacking up the front of the bike, using a 5mm hex key, I removed the upper shock cover plate (the plate on the frame in front of the fuel tank).
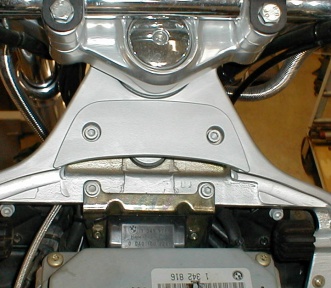 |
Front shock mount cover plate. |
Exposing the upper front shock mount.
 |
Upper front shock mount. |
Using an 8mm hex key socket on an extension I loosened the lower shock mount one full turn ( I didn't want to try to pull the bolt out yet). Here's why it turned out to be a good idea to have removed the gas tank,... To undo the upper shock mount, it takes two wrenches.
 |
Breaking loose the lower mount. |
The center shaft of the mount needs to be held still with a 5mm hex key (don't try to turn the hex key) while using a 15mm box-end wrench to loosen the locknut (turn counter clockwise). Unscrew the nut a few turns but don't take it off yet.
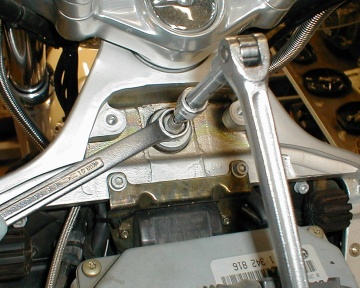 |
Loosening the upper mount. |
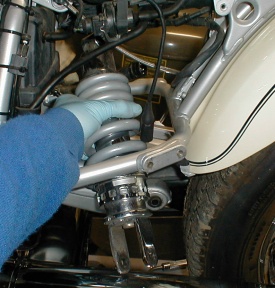
With the front shock mounts loose, I jacked up the front of my bike. I went slow and kept checking that the tie straps were ok. To clear all the mounts, the front wheel needs to be raised about two and a half to two and three quarters inches. Before removing any of the shock mounts, it was necessary to remove the brake hose "Y" from the front forks. Just a simple matter of removing the nut (10mm socket) and slipping the "Y" off the stud. To get the shock out the brake hose will get tight but not so much so that it warrants removing any more of the brake system.
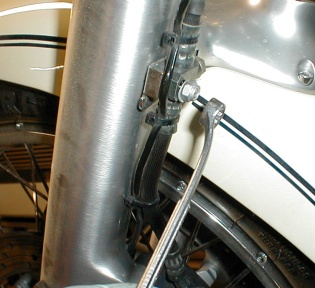 |
Removing the lock nut holding the "Y" to the forks. |
Again using a pry bar, I lifted the front wheel just enough to take any pressure off the upper mounting nut. Unscrewed the nut all the way and took it and the washers off. I slowly let the front wheel down watching the shock doesn't come to grief, I also watched the brake hoses to make sure they weren't deforming or getting stretched. Once the wheel was again in contact with the bench, I was able to hold the shock with one hand and unscrew the lower mounting bolt with the other. With both mounts off, I just lifted the shock, tipped the bottom out towards the left side of the bike and slid the shock and spring out.
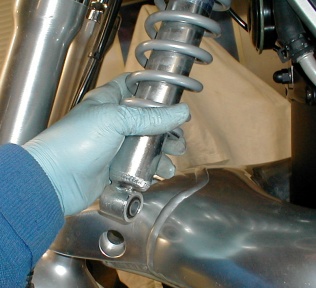 |
Lifting out the front shock. |
Here's a photo of all the parts in the upper mount.
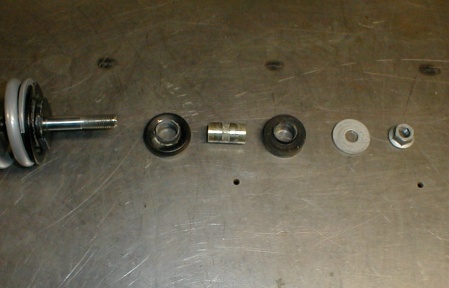 |
Front upper shock mount. |
Before remounting the front shock, I checked the two rubber bumpers (one on the bottom and one on the top of the upper mount) for wear.
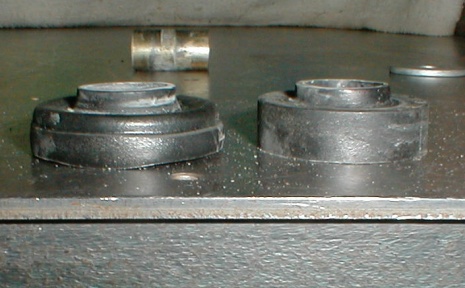 |
Lower and upper shock bumpers. |
As you can see in the photo, the one on the left (off the bottom) is showing more wear than the one on the right (off the top). If the one on the left had shown any more wear (squished) , I would have replaced it. Because there is a spacer sleeve which the shock is mounted on, if the rubber bumpers get too worn, the mount could start getting noisy when going over bumps. There is no fear the shock would come off, it would just get noisy (clacking sound when going over a bump).
To put the shock back on, I started by greasing the shaft before sliding the metal bushing on. With the bushing in place I next slid on the lower rubber bumper. I then slipped the shock back into position against the top and fit the upper rubber bushing, washer and nut. I threaded the nut on as far as I could with just my fingers but didn't tighten it. I put the pry bar under the front wheel and lifted the front end to meet the lower shock mount on the telelever swing arm and threaded in the lower shock mounting bolt (remembering to grease the bolt shaft before threading it in).
Lower the motorcycle until both wheels are back on the ground and the weight of the bike is back on both wheels. I tightened the the lower mount first then holding the center of the upper mount still, I tightened the upper mount. Refit and tighten any brake parts that were removed, fit the upper mount cover and tighten. Lastly, refit the gastank. Ready for a test ride?
Copyright © 2009 Pokie Parmidge